total lawn elimination using no till beds

Total lawn elimination using no-till beds

I don’t like mowing a yard, especially when the yard is on a farm.  It irritates me to push a noisy piece of machinery over a piece of land that yields no food for me or the others living here.  The roaming rooster and guineas glean a little here and there, but there really are not impressed with the selection at this particular salad bar.  A yard is great for a picnic, but I would prefer a pasture for a picnic any day.

I am vowing that this coming year the mowing will be minimized.  Going in are perennial beds, hugelkultur mounds, insectory plants by the hundreds and a kitchen garden for fun.  The front yard outside of mine and Kristin’s door is the first to fall.  Step one is to kill the grass or otherwise remove it. Well, actually step one is to figure out where the beds will go and do some measuring and flagging.
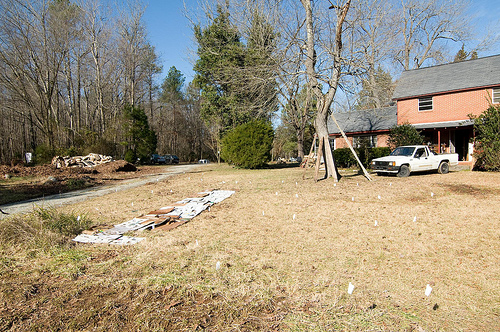
A few years ago I attended a workshop at the annual CFSA conference presented by Susana from Salamander Springs Farm. The workshop was all about building no-till beds on top of grass.  I finally found the notes in one of the piles of notebooks that I have only recently brought together into one pile.  The notes spell out a no-till “Layer Cake” garden bed recipe:

Step one – “The Plate” consists of large sheets of cardboard laid over existing pasture or lawn.
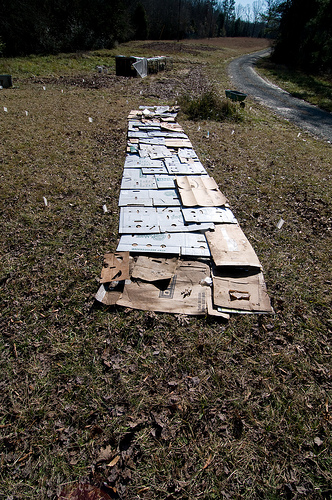
Step two – “The Cake” consists of several inches of manure or compost.

Step three – “The Frosting” consists of mulch such as leaves, old hay, shredded paper and straw.
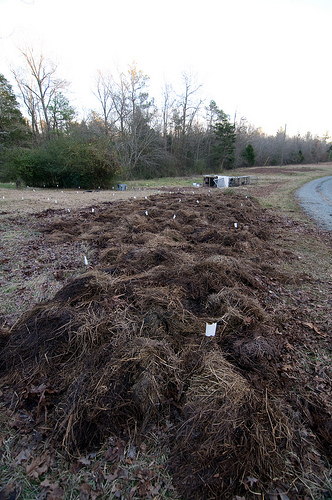
Step four – “The Baking” consists of letting it all settle and rot for three to four months.

Step five – “The Eating” consists of pulling the mulch back to put in plants and replenishing the mulch as the plants grow.

For our cardboard needs we almost always head to Siler City.  The dollar stores’ Dumpsters are usually a nice jackpot for all sizes of box, not necessarily a requirement to fit most mulching needs.  For larger jobs we would hit furniture and appliance stores.  The boxes are bigger and thicker providing more grass and weed killing power.  For uniformity of boxes, the local ABC Liquor store would be perfect.  Most folks hit them up for packing boxes.  For wax boxes, hit the grocery… Since this particular project was just a piece of a front yard, the dollar store cardboard works well.  The only problem is the tape.  There is a lot of tape to remove and dispose of.
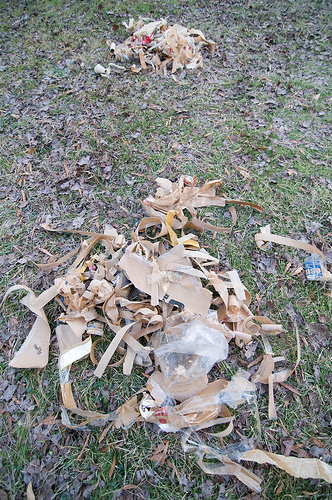
While peeling off tape, you get to see where all the crap products come from and come through.  Most of the importers seem to be in New York City of New Jersey.  The origins are India, China, Korea, Vietnam.  None of the boxes were made from recycled material (no notices on the boxes), so I will probably be mulching with cardboard descended directly from trees, most likely trees from Canada.  That is a long way to go in order to get into my front yard.  The boxes also have loads of staples, fabric tape and heavy duty packing tape holding everything together.

The value of the boxes and its associated connectors is probably higher than the value of the stuff inside the box. I know the value of what I am about to grow on and through those boxes is higher than the box plus the stuff inside.  And then some – mostly because so much comes from the cardboard.  Earthworms tunnel under and through it; pill bugs, beetles and earwigs make their home in the crevices between the layers; fungal mycelia run like branching rivers throughout the whole bit.  All of this activity leads to the decomposition of the still useful organic matter and carbon that is nestled within the cardboard.

What would have taken years to happen with the use of a new log, the loggers, grinders, pulpers, pressers, importers and exporters have made into a readily available haven for all sorts of micro and macro interactions. But the folks at the end of the box-chain would have just thrown it away or possibly recycled it into more cardboard that would eventually be thrown away (nothing against recycling cardboard) whereas we at Circle Acres have really recycled the box and returned it to its rightful place – rotting on the ground and being digested by those who can do such a thing.
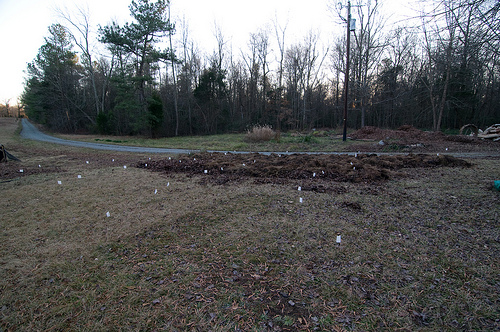
The only drawback to this system is that it takes a really long time to build.  For one person, by hand, estimate at least two hours to go twenty five feet.  Then of course there is the “baking” part, but after three or four months the area should be grass and weed free.  It will also be a nutritious place to start off new Spring plants for Summer harvest.

This entry was posted in circle acres, permaculture, scavenging. Bookmark the permalink.

3 Responses to Total lawn elimination using no-till beds

  1. Ali says:

    another great post! Love the easy to remember layer cake idea & that those boxes are doing so much more than they would have. Can’t wait to see how it looks after all the baking & eating. :)

    Hope you are all doing great. Miss you in Wilmington, but this is such a wonderful thing you are doing out there!

  2. Nicole says:

    No-till gardening is the best! I did a garden (20′x30′) in our backyard last year using this method and it’s worked wonderfully! Instead of cardboard though I used a few layers of wet newspaper and then piled about 6-8″ of compost on top that we got from the city on the cheap. I planted in the spring and didn’t have any problems with grass throughout the growing season. And, then all I am planning to do this year is add some leaves on top and do a little hand tilling and hopefully it’ll be good to go. I’ve also seen this method of gardening called “lasagna” gardening – there’s a decent book on it, but it’s quite repetitive. Digging the website, Trace!

  3. Jacquie says:

    you’re on the right track! I lived in an area that was all heavy clay — nothing but acid-loving weeds grew. Over the winter as produce disappeared from the freezer, I would restock with bagged vegetable clippings, fruit cores etc. – anything edible and not meat or fat. In the spring and during the summer I would layer these “saved goodies” between the cardboard, raked-up dead grass, newly-pulled green grass, newspaper (black ink only), and weeds pulled from existing garden beds, whatever I could find. Do not laugh…I even piled in deer and moose droppings. Throughout all of these layers I sprinkled generously the soil from one bed left unplanted for this purpose along with the soil mulch found in the woods by uprooted trees. Within a few years I had several beds all producing abundantly. Every fall I would add spoilt produce collected from wherever I could find some and made sure earthworms were present to do their work over the winter. Beautiful soil!

cfsa farm tour edible earthscape

CFSA Farm Tour – Edible Earthscape

Carolina Farm Stewardship Association now runs two farm tours per year, one in the Spring and another in the Fall.  The Spring tour has been going on for quite some time, but the Fall tour is in its infancy, this most recent tour being the third annual.

Our first stop this time around was Edible Earthscape, about a half hour drive from our land.  Edible Earthscape, home to a one acre farm intensive incubator farm, is also home to the Piedmont Biofuels Cooperative.  Edible Earthscape is farmed by Haruka and Jason Oatis with the help of several interns.  One of the interns, Brandon, gave us our tour.

On many levels, Edible Earthscape is committed to sustainability and biodiversity within their small farm setup.  Their primary irrigation system uses runoff from the greenhouse stored in a series of 275 gallon totes.

All vegetable rinse water is recycled back into the irrigation system through pipes connected to the wash sinks.

Fall cover crops of cowpeas were recently sown among the freshly mulched raised beds.  Adding leaf litter and other mulches gives our primarily clay soils more “spring” and allows for better drainage.  Over time, heavy mulching also helps with everything from water retention to freeing up nutrients that might otherwise become locked up in the heavy clay.

Bamboo is harvested locally and serves as trellising systems throughout the farm.

The farm focuses much of its energy on Asian heirloom varieties with an added emphasis on seed saving.  Burdock root is grown using a small bamboo chute or trench in order to train the root.  Normal burdock root grows deep and is difficult to remove from our clay soils.  The bamboo chute allows easy access to the root for harvest.

Turmeric (in the ginger family) does moderately well in our climate if removed from the ground and placed in greenhouses to overwinter.

Hops also grow well in our climate, the ones in the picture below were recently harvested for beer brewing.

Flowers add to the biodiversity of the farm both by having the flowers themselves and by attracting beneficial insects.

One of the awesome sights on the farm were the huge trellises of beans, gourds and squashes.  Asian varieties of noodle beans, cucumbers and more formed dense walls of green in contrast to the red clay below.

Add in stevia, borage, Thai bottle gourds, Japanese purple sweet potatoes, echinicea…

A diverse farm is also home to plenty of creatures –

Tomato hornworms (Manduca quinquemaculata) are quick destroyers of the leaves of tomato plants.  They can quickly defoliate entire plants in an organic system.  However, braconid wasps (Cotesia congregatus) will parasitize hornworms in the biodiverse system of yarrows, clovers, and lemon balm that Edible Earthscape has created.

The white cocoons on the hornworm are the developing wasps, which have already started the process of eating their host.  Once most of the wasps emerge, the hornworm will be dead or dying.

What small farm would be complete without a chicken tractor?

And finally the wild edibles that can be found in the places where agriculture is not considered a war on the land.  Winged sumac (Rhus copallinum) supposedly makes a decent lemonade type drink.  Kristin thinks it might be a bit too sour though.

This entry was posted in farm tours, food sources, foodshed, permaculture. Bookmark the permalink.

2 Responses to CFSA Farm Tour – Edible Earthscape

  1. Tami says:

    Trace,
    These photos are gorgeous!

  2. Haruka says:

    thank you trace for the post! I’m glad you enjoyed the tour.

permaculture short courses in wilmington

Permaculture short courses in Wilmington

I am not an expert, and I hope to never be one. The world has too many so-called experts and not enough people actually unafraid to fail. Failure provides education, something that cannot be taught by an expert or a textbook. It is a personal risk in the unknown and a strengthening process that makes the end product that much better. Many of the things I tried with this project have been miserable failures the first time around but are now successes. Through this process I hope to relay to you what is working and how things can be improved with local food.

I have been thinking about doing a presentation about local food, and now, with a new series of workshops, I get a chance to write it and break it out. This will be a good opportunity to start building a local foods community in Wilmington and elicit ideas on what that means to other folks. It will also be a good time to talk about what hasn’t worked with Cricket Bread, what the drawbacks are, where the support is minimal.

Some of the ideas I have for the presentation include defining our sources, discussing regional availability, settling on substitutions, preserving, basic foraging and scavenging, sample weekly menus based on the season, where to buy or find the basics, buying in bulk and my personal experiences with local food. Thanks to April and Jessica for helping me brainstorm a bit yesterday on the subject of “what would you want out of this workshop?” If you all have more ideas, please comment.

There are other short courses in this series besides the Seasonal Eating class. Contact Neal Taylor (info at bottom) about these workshops. All courses are in Wilmington, North Carolina.

Principles of Permaculture – 10/30/2007 6-7pm

This will be a more in-depth discussion of the principles from each of the two founders of Permaculture. We hope to give everyone enough background with this class that you’ll leave knowing some good starting places to implement Permaculture in your own place.

Starting Your Own Vegetable Garden – 11/6/2007 6-7pm

Want to know where, when, and how to get started with a vegetable garden of your own? This course will discuss different ways of building good garden soil, appropriate fertilizing techniques, options for layout and size, and recommendations for maintaining soil fertility.

Seasonal Eating – 11/13/2007 6-7pm

One of the best ways to decrease your “food miles” is to eat foods that are in season and grown locally. In our climate, that also means learning to preserve that fresh food so it’s available at other times of the year. This course will introduce ways to gear your eating habits to the seasons and how to can, freeze, dehydrate, etc. those summer crops that you want to enjoy in winter! (Guest Speaker – Trace Ramsey)

Natural Building – 11/20/2007 6-7pm

With everyone talking about green building these days, why not take it to the extreme? Natural building is sustainable, with low embodied energy, using materials found locally. Whether it’s cob, straw bale, timbers, or thatch, this is a building option that is beautiful and easy on the Earth. This presentation will focus on a straw bale project in Raleigh, with examples from other parts of the country as well. (Guest Speaker – Brent Bishop)

All courses will be held at Tidal Creek’s Community Room, above the Co-op. The topics are subject to change, but I will email everyone a week before each class to confirm the topic and/or guest speaker. The fee will be $20 per class, or $50 for all four classes. Please respond to this email or call Neal with the class(es) you would like to attend so we’ll have the facilities in order. We are also organizing classes and workshops after the holidays for all the other topics from the survey, especially indoor gardening, beekeeping, and passive heating and cooling designs. Thanks again, and I look forward to hearing from you.

Neal Taylor
One World Design
oneworlddesign -at- ec.rr.com

View all posts by Trace

This entry was posted in permaculture, workshops. Bookmark the permalink.

3 Responses to Permaculture short courses in Wilmington

  1. Jessica says:

    Hey, I think this is a great idea! I know that when I started out, just a basic calendar of what crops grow each season would have been a huge help.

  2. April says:

    I’ll help you brainstorm anytime! Next time we use a flip chart!

  3. Neal says:

    I think all your ideas for the presentation are great. Sources especially. Any ideas on getting the word out for this class would be great. If you think the cost of the classes is a problem, I’m open to rethinking that. Great blog!

Shopping Basket